Update on Mon, 22 Apr 24: We can use VMWare Workstation with physical disk option to install Windows to an external hard disk. Using the Hasleo WinToUSB is not recommended. Rest of the steps remains the same.
This guide will walk you through installing Windows 10 on an external hard disk drive and booting from it on an Intel mac. No need to use BootCamp Assistant and partition the mac hard drive. We will do dual boot.
Before proceeding make sure you have an USB drive for drivers, external hard disk (SSD recommended connected to Thunderbolt port) for installing Windows and wired keyboard and mouse.
-
First we need to download the BootCamp drivers for the mac model that the Windows will be running on. For that we can use Brigadier. We can also use BootCamp Assistant > Action > Download Windows Support Software to download the drivers.
-
We need an USB drive formatted as
ExtFATand copy the driver files to it. With Brigadier you will admgfile. Mount it. With BootCamp Assistant it extracts the contents to the folder specified during download. Copy the contents to the USB drive. The drivers include two folders$WinPEDriver$andBootCamp. -
We need Windows for this step and Hasleo WinToUSB (paid app). We can use a Windows VM also. I used VMWare because WinToUSB is not detecting my SSD on Parallels.
-
Next format the external hard disk with
ExtFATformat and connect it to Windows VM. -
Download Windows 10 iso file from Microsoft.
-
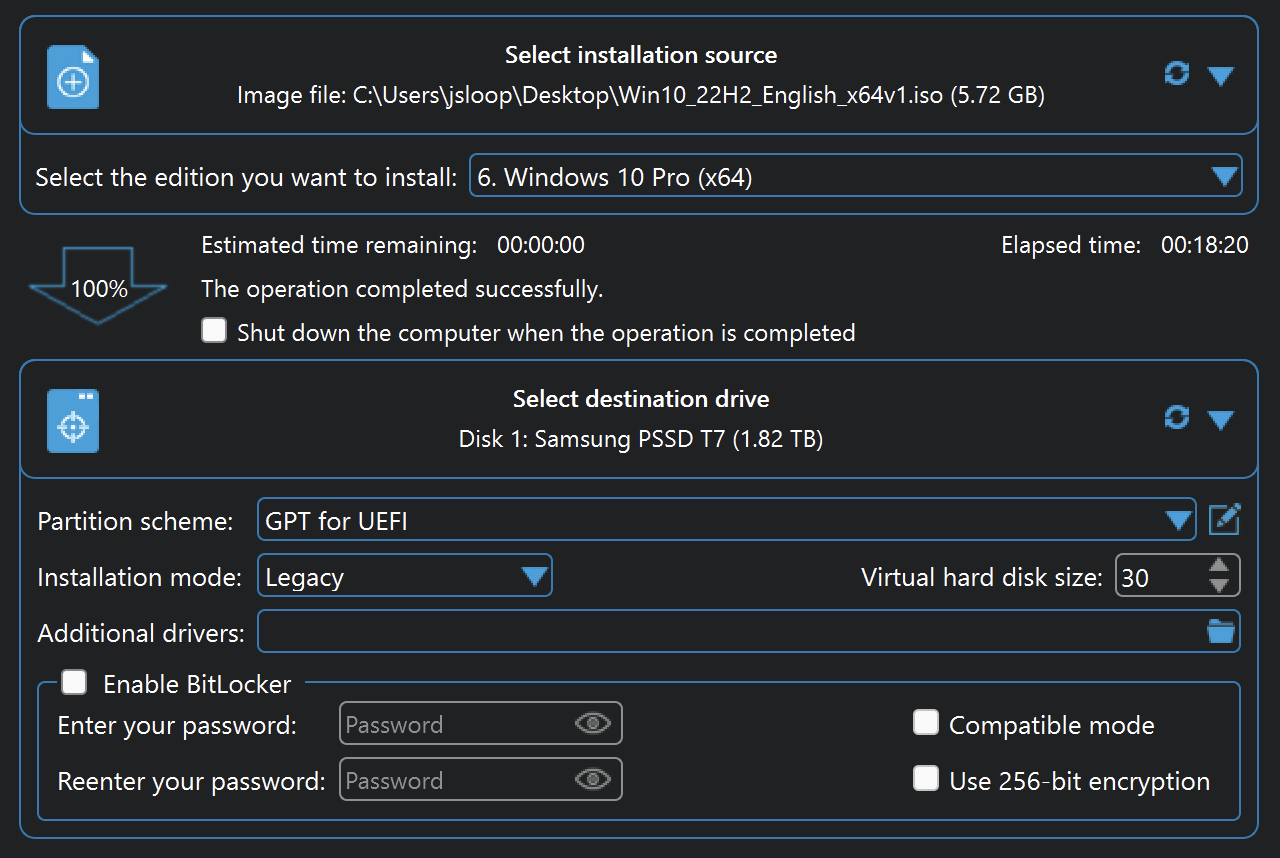
From the Windows VM, run WinToUSB and select the
Windows To Go USBoption.
Note that the Windows installed on the SSD will be in Windows To Go mode.- Select the Windows 10 iso file for the installation source. Choose the required edition from the dropdown.
- Select the SSD for the destination drive.
- For Partition Scheme choose
GPT for UEFI - For Installation mode select Legacy. Virtual hard disk size is not relevant for this option. No need to enable BitLocker. Click Proceed.
This will format the SSD and install Windows to it. Once done, reboot the mac.
-
On reboot hold Option key so that boot menu will appear and select the EFI Boot option with SSD disk icon (mostly the last one in the row). This will boot into Windows from where we can setup Windows account. We need wired keyboard and mouse as the magic mouse and keyboard won't work without drivers. I am using iMac for dual booting Windows. I didn't try it on a Macbook. Probably the keyboard and trackpad won't work without drivers. Continue the setup process and Windows loads!
-
Next plug in the USB with the drivers and run the
Setup.exein the BootCamp folder. Check if WiFi, sound, magic mouse, keyboard etc. are working. For me all drivers were not installed from this step. I had to manually install them. Check Device Manager to see if there are unknown devices. This shows bluetooth, camera, network, and other controller driver. Click on each item, right click and choose
 Update Driver. ChooseBrowse my computer for driverand select the USB drive driver folder. Make sureInclude subfoldersis selected. This will find the appropriate driver and install it. The Audio device appears in the Device Manager but there is no sound. To fix this go to$WinPEDriver$\Cirrus, right clickcs4208_38.infand chooseInstall. Try changing the volume now. If no sound is heard, reboot. The sound will work. For me Magic Mouse appears under connected devices in Bluetooth, but it did not work. Remove it from the Bluetooth devices and add it back. Now the mouse started working but scroll did not. I installed$WinPEDriver$\AppleWirelessMouse\AppleWirelessMouse.infand\$WinPEDriver$\AppleBluetoothBroadcom\AppleBTBC.inf. Now the mouse stopped working. So I removed it from the Bluetooth devices list and rebooted. Then turned off the mouse and on again. Added the mouse from Bluetooth devices and it worked. -
On reboot Apple logo will be shown and then the boot menu appears where we can choose the Macintosh HD to boot into macOS or Windows SSD device to boot into Windows.
For dual booting Windows I recommend booting from external disk instead of internal bootcamp partition as it will keep the mac hard disk intact and you get more space.
Ergonomics
Mouse Scroll Direction
The mouse scroll direction is different in Windows and if you want to invert so that magic mouse works similar to mac, follow the below steps.
Open Device Manager and expand Mice and other pointing devices. This will show HID-compliant mouse For me there are 3 HID-compliant mouse entries. For each right click, check Properties, under Details tab, select Device instance path. Note down these values in case something goes wrong. Mine appears like this.
HID\VID_413C&PID_301A\7&B109508&0&0000
HID\VID_05AC&PID_8296&MI_01\7&3161E94&0&0000
HID\{00001124-0000-1000-8000-00805F9B34FB}_VID&0001004C_PID&0269\9&11F581C4&2&0000
Now open Registry Editor (or use the below script) from search and under HKEY_LOCAL_MACHINE\SYSTEM\CurrentControlSet\Enum\HID and find the HID value that you obtained. Expand it to find Device Parameters, click on it and change the hexadecimal value from 0 to 1 for FlipFlopWheel. Do this for each HID value. Exit Registry Editor and reboot. This will change the mouse scroll direction.
Below is a PowerShell (invert-mouse.ps1) script that automate this. Run it as administrator and reboot to invert the mouse.
# invert mouse

Get-PnpDevice -Class Mouse -PresentOnly -Status OK | ForEach-Object {
    "$($_.Name): $($_.DeviceID)"
    Set-ItemProperty -Path "HKLM:\SYSTEM\CurrentControlSet\Enum\$($_.DeviceID)\Device Parameters" -Name FlipFlopWheel -Value 1
    "+--- Value of FlipFlopWheel is set to " + (Get-ItemProperty -Path "HKLM:\SYSTEM\CurrentControlSet\Enum\$($_.DeviceID)\Device Parameters").FlipFlopWheel + "`n"
}
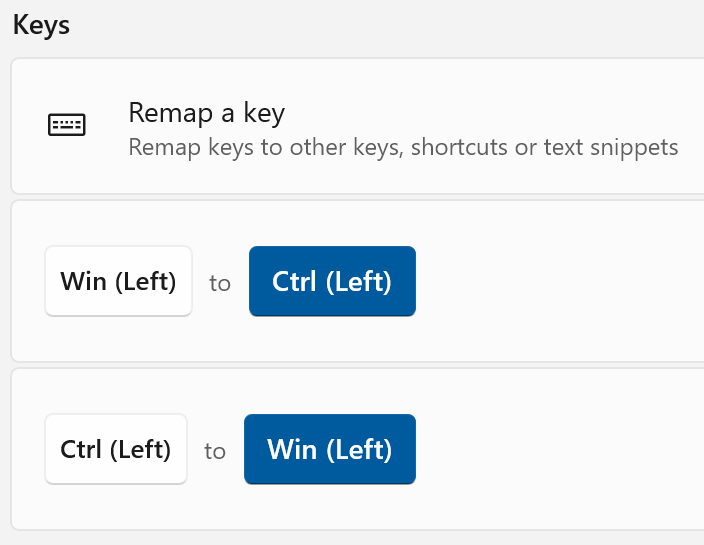
Control Key Remapping to Command
On Windows the Command key opens up the Start menu. On Magic Keyboard I find the Control key combination a bit difficult to type. Also having consistent keyboard layout between Windows and macOS helps. To remap the keys, download and install PowerToys from Microsoft. Open PowerToys and enable Keyboard Manager. Then under Remap add two key remapping.
+---------------+---------------+
| Select        | To Send       |
+---------------+---------------+
| Press Command | Press Control |
| Press Control | Press Command |
+---------------+---------------+

Enhancements
Hibernation is disabled by default. If you want to enable it open Run using Windows + R and run gpedit.msc. In the Local Computer Policy > Computer Configuration > Administrative Templates > Windows Components > Portable Operating System double click Allow hibernate(S4) when starting from a Windows To Go workspace choose Enabled. Restart and Hibernate will appear under Power option. For me system is not restoring the workspace after starting for hibernate.
Change Volume using Function Keys
For this we need to use AutoHotkey program. Install the the v2 version. Then create a file volume-btn.ahk with the below content.
#Requires AutoHotkey v2.0
#SingleInstance Force

F10::Volume_Mute
F11::Volume_Down
F12::Volume_Up
Double click the file to run the script. This will map the function keys to volume controls. To auto start this mapping place the shortcut to this file in the startup folder.
Sound Mute on Login
Another issue I found is that the audio volume level is reset to 0 after login. If play sound on login is enabled I can hear the Windows chime on boot, but the volume is 0 after login. I couldn't find any system settings that can fix this. So here is a bat script (set-volume.bat) that will set the volume to 25 on boot.
@echo off
setlocal

REM First set volume to zero and increase it by 25%
set zeroVolume=-65535
set volume=16383

set nirCmdPath=C:\bin\nircmd\nircmd.exe

"%nirCmdPath%" changesysvolume %zeroVolume%
"%nirCmdPath%" changesysvolume %volume%

endlocal
This script uses a command line program NirCmd. Extract it to C:\bin\nircmd\. Save the set-volume.bat script in C:\bin\. Create a shortcut. Press Win+R and run shell:startup which will open the startup folder. Move the shortcut to this folder. Now the script will run on every login which will set the volume to 25.
NB: The hibernate not working might be due to the Windows To Go mode. When I run Windows installed to the internal disk without any dual boot hibernate works.