When developing apps that connect to a server, mostly we have a staging server and a production server. As such we need two app versions, one the dev version that connects to the staging server and the other that connects to the prod. These apps could have different configs to load, especially if it's based on Firebase. Firebase provides one GoogleService-Info.plist file for each project. Below demonstrates how we will use this as a use case to demonstrate working with multiple app configurations, schemas and Xcode config file all using a single target.
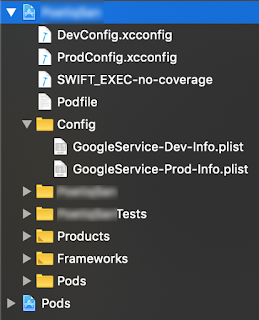
- First, download the Firebase config for both dev and prod to
Configfolder under the project root and name them asGoogleService-Dev-Info.plistandGoogleService-Prod-Info.plistrespectively.
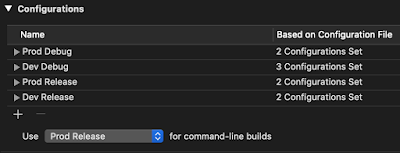
- Under the Xcode configuration for the project, click on the
Project > Infoand underConfigurations, we need to add one each forDev DebugandProd Release. For that, fromEditorchooseAdd Configuration > Duplicate "Debug" Configurationand name itDev Debugand follow the same for prod, but useDuplicate "Release" Configurationoption.
- Now under the
Build Settingstab, we will add anENVflag. For that click the plus icon next toLevelsin the header menu and chooseAdd User-Defined Settingswith the following values.
| Dev Release | DEV_RELEASE |
| Prod Debug | PROD_DBG |
| Prod Release | PROD_RELEASE |


- Next click on the app name under the
Targetsection and chooseBuild Phasesand add a newRun Script Phasewith the following content.
if [ "$ENV" == "DEV_DBG" ]; then
    echo "Dev debug config found"
    cp -r "${PROJECT_DIR}/Config/GoogleService-Dev-Info.plist" "${BUILT_PRODUCTS_DIR}/${PRODUCT_NAME}.app/GoogleService-Info.plist"
    echo "Firebase staging plist copied."
elif [ "$ENV" == "PROD_RELEASE" ]; then
    echo "Prod release config found."
    cp -r "${PROJECT_DIR}/Config/GoogleService-Prod-Info.plist" "${BUILT_PRODUCTS_DIR}/${PRODUCT_NAME}.app/GoogleService-Info.plist"
    echo "Firebase production plist copied."
fi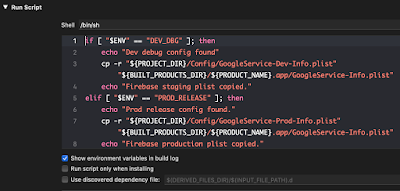
This will copy the right plist and place it under the `.app` folder with plist renamed to `GoogleService-Info.plist`. This makes the call to `[FIRApp configure];` to work without having to manually load the plist and specify the credential info.
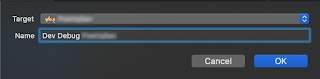
- Next, we will create multiple schemes, one for building the staging version and the other for production. For that, click on the target next to the Run/Stop, button and choose
New Scheme. For the target, choose the target app and let's name the schemes asDev Debug FBAppandProd Release FBApp.
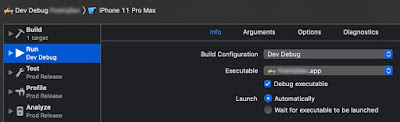
- We need to set the right configuration for each scheme. For that click
Edit scheme, and for the debug scheme, under theRunsection, forBuild Configuration, chooseDev Debugand for the production scheme, chooseProd Release. UnderManage schemes, make sure these schemes haveSharedenabled.
With this, we have Firebase setup working with multiple environments. However, if we use other Firebase options like
FirebaseAuth, we need to add additional settings like URL Type so that after the user sign-in, the invoking the app works. For this, we need to create a new xcconfig as described next. From File > New File > File, choose Configuration Settings File and name it as DevConfig.xcconfig and another with ProdConfig.xcconfig. Do not add the xcconfig file to any target as it's a build config file and we don't want it to be shipped with the app bundle. The content of the dev config follows.APP_NAME = FBAppDev
APP_BUNDLE_ID = org.example.app.FBAppDev
APP_FIREBASE_URL_SCHEME = com.googleusercontent.apps.25135051042-2utrt0j007lp7vf23p73fd306trszqn2
#include "Pods/Target Support Files/Pods-FBApp/Pods-FBApp.dev debug.xcconfig"Note that in case of URLs in the
xcconfig, we need to escape it like APP_SERVER_URL_LOCAL = http:/$()/localhost:4000/.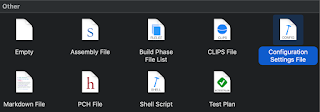
Here we define a variable
APP_FIREBASE_URL_SCHEME with value taken from the reverse client ID of the dev plist. We will give a different bundle ID so that we can have both staging and prod versions of the app installed, without one overwriting the other.- We need to specify the
xcconfigfile for each project configuration we created before (in step 2). Under theProject > Configurations, forDev Debug, expand and choose theDevConfigfor theBased on Configuration Filevalue. Same for the prod configuration name.

- If the project uses Cocoapods, first close the workspace, delete the
xcworkspacefile, thePodsdirectory and thePodfile.lockand runpod installwhich will install the dependencies as usual and generate the Pod xcconfig files for each configuration we have, but does not set it as we have already set a config. So we include the corresponding Pod config in the xcconfig using#include.
- For the final step, we need to parameterize the variables in the
Info.plistfile as follows.
| Bundle identifier | $(APP_BUNDLE_ID) |
| Bundle name | $(APP_NAME) |
| URL Types > URL Schemes | $(APP_FIREBASE_URL_SCHEME) |
We now have a project setup with different configurations with a single app target.